 Clean out junk for more storage space.
Get your PC running like new:
Clean out junk for more storage space.Enjoy faster performance and startup speeds.Update your programs automatically and avoid security risks.
 Clean out junk for more storage space.Enjoy faster performance and startup speeds.Update your programs automatically and avoid security risks.
Make an old PC live longer or a new PC run better with AVG TuneUp. Sleep Mode technology boosts speed and performance by forcing apps into hibernation, while disk and browser cleaners free up storage space.


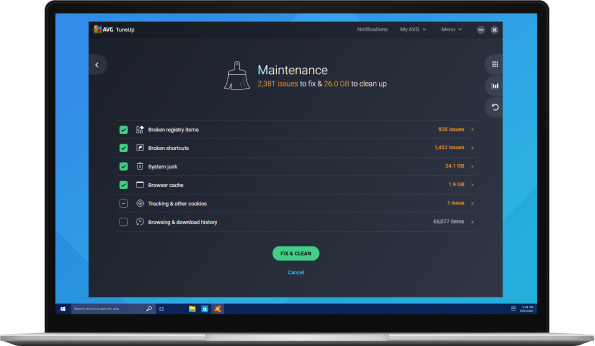
Tired of bugs, crashes, and freezes? AVG’s Improved Automatic Maintenance tunes your PC every week for you, so you can enjoy better performance every time you turn it on.

If you want your Windows operating system to work its best — with fewer crashes and errors — let us routinely fix your registry or try this registry cleaner tool.

Use a browser optimizer and clean up browser traces, tracking cookies, cache files, and program leftovers to enjoy more disk space.
Get your programs running faster, your PC starting quicker, and your games running smoother with AVG TuneUp and our patented Sleep Mode technology. Here’s how it works:
Installed programs slow down your PC by hogging memory and could cause high CPU usage. Our completely revamped Sleep Mode technology puts them to sleep and wakes them up when you need them — and not a moment sooner.
See how Sleep Mode works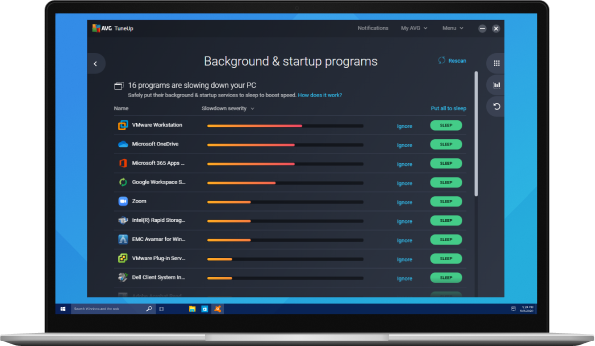
Unnecessary programs, old toolbars and trial versions, and software that came preinstalled in your PC can take up space and cause trouble down the road. Which is why we make it easy to get rid of them.
Our Software Uninstaller detects bloatware and helps you get rid of it, along with programs you no longer use or forgot about.
See how Software Uninstaller works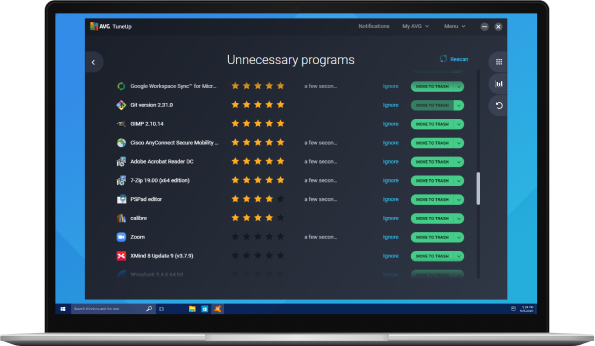
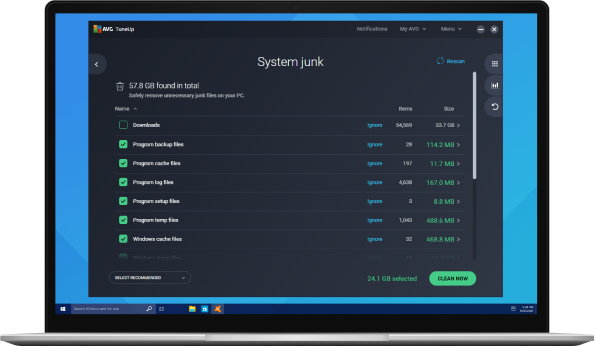
Your PC starts accumulating junk from the very first day you use it: leftover Windows files, junk from the web, and more. Use Mac or Windows disk cleanup in AVG TuneUp to create more space for the things you need.

Get rid of useless junk (e.g., installer files, old backups, and temporary system files), or use a junk remover, to make space for the stuff that really matters.

Clean out programs that clog up your computer with old junk files. AVG TuneUp knows exactly where that data is hidden and finds it for you with a simple scan.
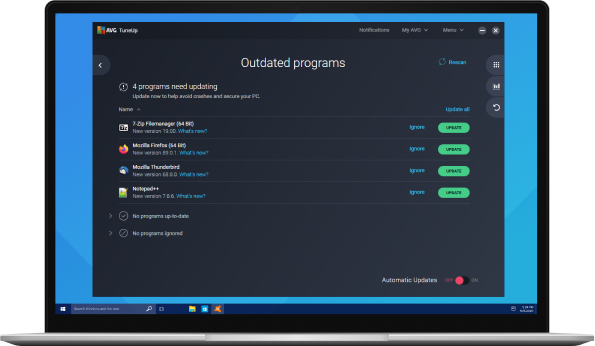
AVG TuneUp’s Software Updater checks your installed software and updates it all to prevent security issues, bugs, and other problems.
We’re not just making stuff up: the numbers are in, and AVG TuneUp is the clear solution to your device’s performance problems.
For personal and family use only. Not for business or commercial use.
 Windows 11, 10, 8, 7 and Windows XP
 MacOS 10.10 (Mavericks) or above
 Android 5.0 (Lollipop, API 21) or above
 iOS 10.0 or above
For Windows: Chinese (simplified), Chinese (traditional), Czech, Danish, Dutch, English, French, German, Hungarian, Indonesian, Italian, Japanese, Korean, Malay, Polish, Portuguese (Brazil), Portuguese (Portugal), Russian, Serbian, Slovak, Spanish, and Turkish.
For Mac: English only.
For Android: Arabic, Chinese (simplified), Chinese (traditional), Czech, Danish, Dutch, English, Finnish, French, German, Greek, Hebrew, Hindi, Hungarian, Indonesian, Italian, Japanese, Korean, Malay, Norwegian, Polish, Portuguese (Brazil), Portuguese (Portugal), Russian, Serbian, Slovak, Spanish, Swedish, Thai, Turkish, Ukrainian, and Vietnamese.
For iOS: Arabic, Chinese (traditional), Czech, Dutch, English, French, German, Hindi, Italian, Japanese, Korean, Polish, Portuguese (Brazil), Russian, Spanish, Thai, Turkish, and Vietnamese.
If you're experiencing your computer running slow, there are a few things you can do to speed up and clean up your computer.
First, you can try using a PC cleaner tool to help remove any unnecessary files or programs that may be slowing down your computer. This will help to free up space on your hard drive and improve performance.
It's also important to get rid of bloatware, which are pre-installed programs that you may not need or use. These can take up valuable space and resources on your computer, slowing it down.
You can also test your PC's performance and battery life to identify any hardware or software issues that may be contributing to its slow speed and need to be addressed.
AVG TuneUp is proven to improve your PC's performance. It can help to clean up your computer, remove bloatware, and optimize settings to improve speed and performance.
If your PC is running slow, it could be due to outdated software and drivers, which affect the performance of your PC’s hardware as well as audio and graphics quality. Be sure to check for and install any available updates to improve PC performance. Using a driver updater can help ensure that all of your drivers are up to date. Other ways to fix a slow computer include disabling unnecessary startup programs, deleting temporary files, and freeing up disk space.
To free up disk space on your computer, whether it’s a Windows 10 device or another, you can start by deleting any unnecessary files, uninstalling programs you no longer use, and clearing your browser cache. This method is very time-consuming. You can also download a program like AVG TuneUp to help free up disk space easily and optimize your PC for better performance. With features like Disk Cleaner and Browser Cleaner, AVG TuneUp can help you quickly identify and remove bloatware, clean up your drive space, and improve your computer's overall speed and performance.
One way to tune up your computer for free is by downloading the trial version of AVG TuneUp. This software includes a browser, cache, and cookie cleaner, as well as protection against cyber security threats. If you're looking for more comprehensive protection, AVG also offers a paid version called AVG Ultimate. With AVG Ultimate, you'll get all the features of AVG TuneUp, plus additional security tools to keep your computer safe and running smoothly.
Benchmarking your PC’s performance allows you to measure how fast your PC handles various operations by simulating normal processes, including Microsoft Office and Adobe products, playing games, browsing the web, and editing multimedia files.

Learn how to fix black screen issues on a Windows 10 or 11 PC or laptop, if it appears before or after login, upon startup, or while working.

Find out why your Windows Task Manager is reporting 100% disk usage. Learn why your hard drive is maxed out and how to restore your PC to prime shape.
What are the best graphics settings for GTA V? Here are the top tweaks, tips, and mods to boost low FPS and get the best out of your PC.

Learn how to use Windows utility CHKDSK (Check Disk) commands like /f, /r, /x, and others to scan and repair hard drives in Windows

Find out how to optimize your Windows PC for gaming by boosting FPS and improving overall performance, with this guide from AVG.

How does TiWorker.exe work? Learn how to fix Windows Modules Installer Worker high disk CPU usage with this guide from AVG.

Is your iPhone running slow? Find out why your phone is so slow and learn how to speed up your iPhone in our step-by-step guide.

The Windows Blue Screen of Death (BSoD) is infuriating, but it can be resolved. Learn how to diagnose and fix BSoD errors in Windows.

How does clickbait work and what are the dangers? Discover how to identify a clickbait website and see examples in our guide.
 AVG TuneUp
The powerful, easy way to make your PC faster, cleaner, and better.
Need help choosing the right product?
Yes please
Privacy | Report vulnerability | Contact security | License agreements | Modern Slavery Statement | Cookies | Accessibility Statement | Do not sell or share my info | Subscription details | | All third party trademarks are the property of their respective owners. | © 2024 Gen Digital Inc. All rights reserved.
